Code Generation For Lidar Object Detection Using PointPillars Deep Learning
此示例显示了如何为Pointpillars对象检测器生成CUDA®MEX。有关更多信息,请参阅LIDAR 3-D对象检测使用Pointpillars深学习LIDAR TOOLBOX™中的示例。
Third-Party Prerequisites
Required
启用CUDA的NVIDIA®GPU和兼容驱动程序。
可选的
对于非MEX构建,例如静态和动态库或可执行文件,此示例具有以下其他要求。
NVIDIA CUDA toolkit.
NVIDIA cuDNN library.
编译器和库的环境变量。有关更多信息,请参阅第三方硬件(GPU Coder)and设置先决条件s manbetx 845(GPU Coder)。
验证GPU环境
要验证正确设置用于运行此示例的编译器和库是否正确设置coder.checkGpuInstall(GPU Coder)功能。
envcfg = coder.gpuenvconfig('host');envcfg.deeplibtarget ='cudnn';envCfg.DeepCodegen = 1; envCfg.Quiet = 1; coder.checkGpuInstall(envCfg);
Pretrained PointPillars Network
加载预处理的PointPillarsObjectDetector受过训练LIDAR 3-D对象检测使用Pointpillars深学习example。To train the detector yourself, seeLIDAR 3-D对象检测使用Pointpillars深学习。
矩阵=“预处理点”;预处理=负载(负载(“预处理点”,,,,'探测器');检测器=预处理detector.detector;
pointpillarsDetect入口点功能
这pointpillarsDetect入口点功能带入点云和置信度阈值,并将其传递给经过训练PointPillarsObjectDetectorfor prediction through thepointpillarDetect功能。这pointpillarsDetectfunction loads the detector object from the MAT file into a persistent variable and reuses the persistent object for subsequent prediction calls.
类型('pointpillarsDetect.m')
函数[bbox,分数,标签] = pointpillarsDetect(矩阵,数据元,数据线,阈值)%预测网络的输出并提取置信度,x,y,y,%宽度,高度和类。%加载深度学习网络,以进行预测持续的点斑点;如果Isempty(pointpillarobj)pointpillarobj = coder.loaddeeplearningnetwork(matfile);end ptcloud = pointCloud(dataloc,'intermenty',dataint);[bboxes,分数,标签] = pointpillarobj.detect(ptcloud,'阈值',阈值);结尾
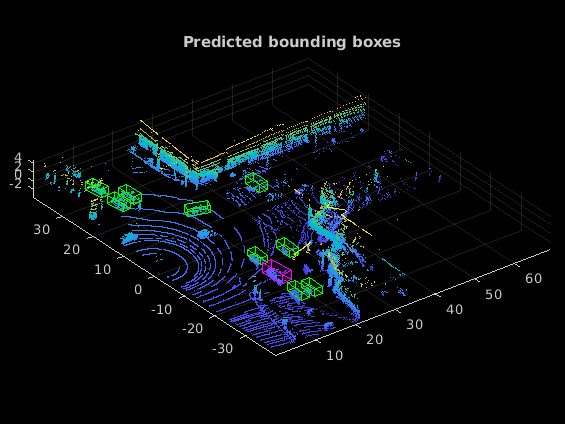
Evaluate the detector for Object Detection
Read the point cloud.
pc = pcread('pandasetdrivingdata.pcd');
在验证的检测器上使用检测方法。
ConfidencEthreshold = 0.7;[bboxes,〜,标签] =检测(检测器,PC,PC,'临界点',,,,confidenceThreshold); bboxesCar = bboxes(labels =='Car',:);bboxesTruck = bboxes(labels =='卡车',:);
Display the detections on the point cloud.
helperDisplay3DBoxesOverlaidPointCloud(pc.Location,bboxesCar,'绿色',,,,...bboxesTruck,'magenta',,,,'Predicted bounding boxes');

Generate CUDA MEXscatter
To generate CUDA® code for thepointpillarsDetectentry-point function, create a GPU code configuration object for a MEX target and set the target language to C++. Use thecoder.DeepLearningConfig(GPU Coder)函数创建Cudnn深度学习配置对象并将其分配给DeepLearningConfigproperty of the GPU code configuration object.
cfg = coder.gpuconfig('Mex');cfg.targetlang ='C ++';cfg.deeplearningconfig = coder.deeplearningconfig(targetLibrary ='cudnn');dataloc = pc.location;dataint = pc.strentty;args = {coder.constant(matfile)coder.typeof(dataloc,[inf,3],[1 0])coder.typeof(dataint,[inf,1],[1 0],[1 0])coder.typeof(confidencEctEncEthreshold)}};代码根-configCFGpointpillarsDetect-argsargs报告
代码生成成功:查看报告
运行生成的MEX
Call the generated CUDA MEX with the point cloud. Display the results.
[bboxes,〜,labels] = pointpillarsDetect_mex(矩阵,dataloc,dataint,confidencEthreshold);bboxescar = bboxes(标签=='Car',:);bboxesTruck = bboxes(labels =='卡车',:);helperDisplay3DBoxesOverlaidPointCloud(pc.Location,bboxesCar,'绿色',,,,...bboxesTruck,'magenta',,,,'Predicted bounding boxes');
助手功能
functionhelperDisplay3DBoxesOverlaidPointCloud(ptCld,labelsCar,carColor,...labelsTruck,truckColor,titleForFigure)%显示具有不同彩色边界框的点云% classes数字;ax = pcshow(ptcld);展示(展示)('长方体',LabelsCar,'Parent',斧头,“不透明度”,0.1,'Color',,,,...carColor,'行宽',0.5);抓住on;展示(展示)('长方体',,,,labelsTruck,'Parent',斧头,“不透明度”,0.1,'Color',,,,...卡车颜色,'行宽',0.5);title(titleForFigure); zoom(ax,1.5);结尾
References
[1] Lang,Alex H.,Sourabh Vora,Holger Caesar,Lubing Zhou,Jiong Yang和Oscar Beijbom。“ Pointpillars:快速编码从点云检测到对象检测。”在2019年IEEE/CVF计算机视觉和模式识别会议(CVPR),12689-12697。美国加利福尼亚州长滩:IEEE,2019年。https://doi.org/10.1109/cvpr.2019.01298。
[2] Hesai and Scale. PandaSet.https://scale.com/open-datasets/pandaset。
You can also select a web site from the following list:
美洲
- América Latina(Español)
- 加拿大(英语)
- 美国(英语)